Tech Tips: Tire balancing, thermostats and more
Something not right with your historic military vehicle? Steve Turchet answers your questions on how to keep ’em movin’!
Staying Well Balanced
How often do you need to balance your HMV’s tires? If you never drove it anywhere, the answer would be once — when they were installed on the rims. However, most HMVs that are not pure show vehicles are driven, and things happen while driving that cause their wheels to become unbalanced. The first symptom is usually vibration when cruising at highway speeds. Wheels out of balance can also cause the dreaded front end shimmy. While almost all wheels (meaning rims) leave the factory perfectly balanced, almost all tires, no matter how costly, have a heavy spot. This causes the tire to bounce when it rolls down the road, and this bouncing increases in intensity with speed. Adding a weight equal to the heavy spot on the opposite side of the wheel (rim) will balance the tire so it doesn’t bounce. This is called static balancing, and is usually done on a simple stand with a bubble level.
Years ago, static balancing was state-of-the-art. Static balancing was also sometimes done by simply jacking a vehicle’s wheel off the ground and checking where the wheel came to rest when allowed to turn freely. Then, weights were added to the opposite side until the wheel would rest at any point. Primitive, but it usually worked well enough for narrow tires on vehicles that didn’t travel much over 45 mph. However, as wider tires came into use, dynamic balancing was required. This is where the wheels are dismounted from a vehicle and spun on a machine. Wide tires can have a heavy spot off to one side, which causes it to wobble side to side as well as bouncing, often the same thing that occurs when a wheel is bent.
Dynamic balancing installs weights on both the inside and outside of the wheel to keep the tire from wobbling side to side as well as bouncing. While many different type of wheel weights have been developed for newer cars with modern, stylish rims, most common HMVs use the older type of simple lead weights that clip to the rim. Hitting potholes or rubbing against a curb can knock a weight off. If you have a flat tire, it may need to be rebalanced after repair if not reinstalled in exactly the same position as when it was taken off the rim, or if the weight was removed. There are some vibrations that feel like a tire balance problem but are caused by other things. Mud on the rim, for example, can unbalance a wheel. Sometimes tires get out of round from sitting: a common occurrence for many HMVs. Other vibrations can be caused by bent wheels, bent axles, or out-of-balance disc brake rotors or brake drums. Bent wheels are very common on vintage HMVs, especially jeeps and MUTTs. If you suspect a bent wheel, take it to a tire shop and have it spun on a dynamic balancer.
There is no practical way to to repair a bent wheel, though many people still try, which often makes it worse. The best thing to do with a bent wheel is to replace it with one that isn’t, then mutilate the bent wheel so someone else doesn’t end up with your problem. While wheels that are not severely bent may sometimes be mounted on the rear of a vehicle or used on trailers, bent wheels still put a strain on suspension systems, wheel bearings and axle shafts, as do wheels that are simply out of balance. Tires out of balance, or tires on bent wheels, will also wear unevenly; and even if mounted on the rear of a vehicle may still cause front end shimmy.
HMMWV Crack-up
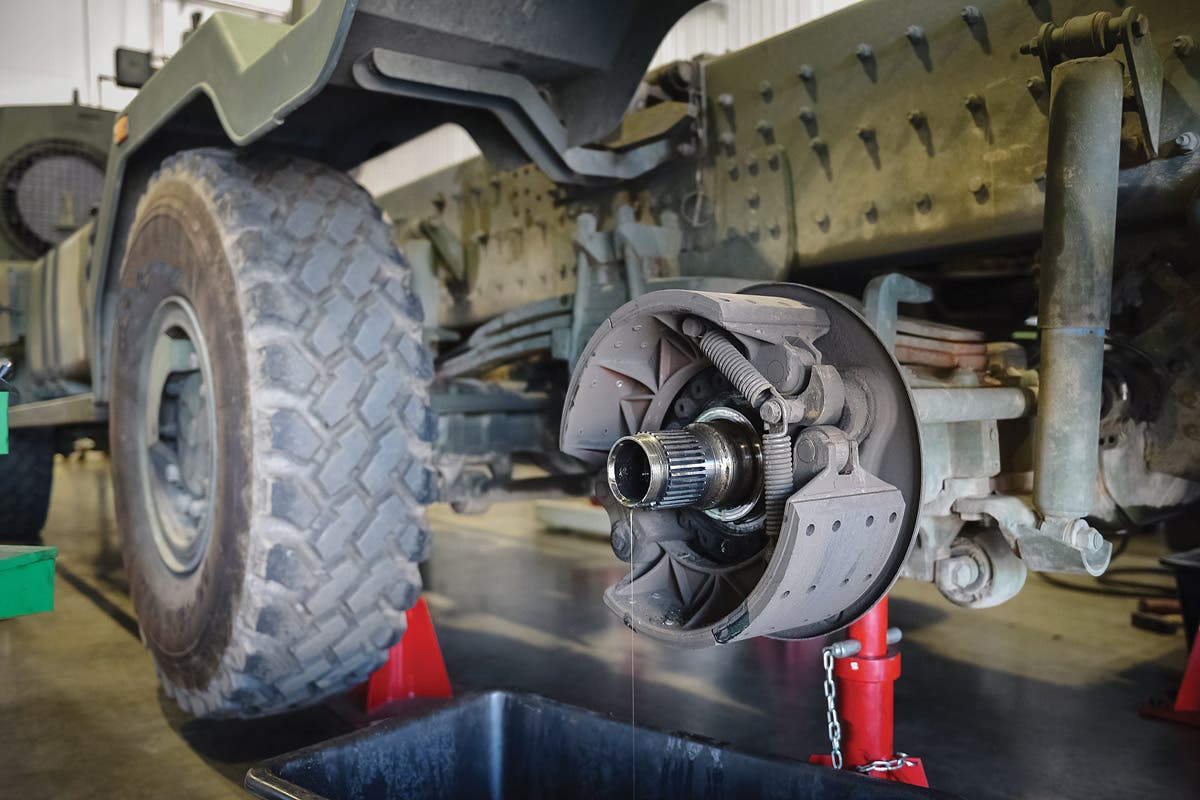
FORSCOM Safety Alert: HMMWV, Cross Members, dated 2 Oct. 06 Light Tactical Vehicles (LTV) has recently learned of a problem on HMMWV vehicles with the front and rear Cross Members manufactured by Oxnard Precision Fabrication Inc. (Cage Code ODEE1). It has been found that the subject Cross Members have been fabricated incorrectly and not to the specifications of TACOM engineering. Both the material the Cross Members are made of and the process in which the Cross Members are fabricated are incorrect.
Testing showed that the subject Cross Members failed in the area where the lower control arms bolt to the Cross Member, not meeting the requirement of engineering drawings. As a result of this failure, the operator could lose control of the vehicle causing possible injury/fatality to the operator and loss of the weapon system.
Investigation by PM LTV Engineers and Metallurgical Lab test results have determined the failures are attributed to several factors related to the quality of Oxnard Precision Fabrication, Inc. provided Cross Members. the the Cross Member and mounting brackets were not Made to drawing specifications and examination of the welding showed poor quality, insufficient penetration or completely missing in some areas. New production vehicles did not receive OXNARD Cross Members, this issue pertains only to spares.
User Actions: Place a copy of the SOUM in the vehicle operating manual. JAW existing PMCS, after each mission, perform inspection of HMMWV underbody/Cross Member. Pay particular attention to TM 9-2320-280-10 dated .15 Jul 04, Table 2-2. If a ODEE1 CAGE CODE is found on a Cross Member and shows noticeable cracking, bending and/or if the welding appears to be insufficient or missing, the vehicle will be considered Non Mission Capable (NMC). Have the vehicle turned in at the DS/GS level for removal and replacement of the Cross Member. If the ODEE1 Cross Member does not show any of the above defects, proceed with mission and continue to inspect after every mission JAW PCMS intervals. If the ODEE1 CAGE CODE is not present, further actions of this SOUM are not warranted, proceed with regular PMCS duties JAW TM 9-2320-280-10, dated 15 Jul 04. , If you have a Cross Member that fits the above description please submit a PQDR via the Army Electronic Product System (AEPS) referencing TACOM SOUM 07-01.
Hot Duck
Q: I recently bought a running and swimmable DUKW. It belonged to a marina, but was garaged for many years. The data plate shows it was built in 1943. It is in good condition, except for surface rust. I intend to restore it, but I worked on it for a week to go out on the lake to see what it would do. It ran very well and I was surprised at how well it ran in the water. But it seemed like the exhaust manifold got dangerously hot. I noticed there were shutters in the drivers compartment. Should these have been opened? —Ron Reeves
A: I assume you’re going to buy manuals before starting your restoration? Among these should be the operations manual. A DUKW has a pusher fan on the engine. Air is pulled in through the grating behind the driver’s compartment, pushed forward through the radiator into the bow compartment, then exits through the openings on the outside of the driver’s compartment. Unlike a land vehicle driving down a road, there isn’t much air flow over the engine, so a DUKW’s exhaust manifold becomes very hot. In fact, fledgling DUKW drivers on night training exercises were often startled to see the manifold glowing red through openings in the floorboards. This is normal (for a DUKW), though one should avoid lugging the engine. A manifold vacuum gauge is a useful addition to any DUKW, showing how hard the engine is working. The greater the load, the hotter the exhaust manifold becomes, and gasoline engine exhaust can get hot enough to melt lead. The shutters you described are merely to heat the drivel’s compartment and have no effect on engine temperature.
Hot Enough For You?
Q: I have a 1956 M38A1. What is the correct thermostat to use? They come in 160, 180, and 190 (F) heat ranges. —Donald Spencer
A: Many people don’t know that the heat rating of thermostats refers to when the thermostat begins to open. This often has little to do with how hot or cold the engine itself may run: that depends upon many factors, such as the condition of the engine and radiator, how hard the engine is working, and the temperature of the surrounding environment. For example, installing a 160-degree thermostat in your jeep is no guarantee that the engine would not run at 200 degrees if pulling a heavy load through a desert when the temperature of the air is 110 F. Generally speaking, most older HMVs, such as jeeps, MUTTS, M37s M715s and CUCVs with cooling systems in good condition and used in average North American climates will benefit best from 180 degree thermostats. For long hot summers or desert operation, 160 would probably be better. On the other hand, when temperatures are consistently below 40 degrees F, then a 190-degree thermostat might work best.
By the way, removing a thermostat is no guarantee that an engine will run cooler. If fact, it may overheat because without a thermostat to regulate the flow, the coolant may circulate through the system so fast that the radiator doesn’t have time to cool it.
Is It Safe?
Q: I have a 1967 M151. The radiator is probably original because several tubes have started leaking. I plan to have it recored as soon as I can afford it, but I would like to know if you think that using a stop leak is safe for the engine? If so, do you have any recommendations? — Dave B.
A: Radiators don’t last forever and will eventually have to be replaced or rebuilt. One can usually get by for a while, or fix a minor damage leak, by using a good quality stop-leak product. Most of these work basically like a blood clot, solidifying where engine coolant meets air, such as a split in a radiator tube, or a crack in an engine block or cylinder head. Unless grossly misused, most common stop-leaks can’t damage an engine. While one usually gets what one pays for in life, high price doesn’t always guarantee effectiveness with stop-leak products. Results also vary with the type, location, and seriousness of the leak. I once used something called KW Block Seal in a GMC engine with a very badly freeze-cracked block and put thousands of miles on the truck with no problems. Radiator tubes expand and contract a lot, so are often harder to seal than block leaks. Other than this, my advice is to carefully read a product’s label and follow the manufacturer’s, instructions, especially in regard preparing the cooling system, whether or not to flush it first, and how much product to use depending upon the capacity of the system. After all, the manufacturer wants it to work so you’ll buy something else from them.
Under Pressure
Q: I enjoy your articles and tips. I have been in the HMV hobby for about 3 years. I started out with an M151, then got an M37. My focus is on the early Vietnam period when my dad was in the Army. This is the time when most Americans didn’t know much about what was going on over there. The focus of my collection is information about those times. According to my dad, GMC M211 and M135 deuces are correct trucks.for those times. I have a chance to buy a good-looking 1955 M135 that is mostly original except for a homemade hard cab. I have driven the truck and it seems to run very good and the transmission seems to shift all right. But I was wondering if there are easy ways to check out the transmission and see what kind of shape it’s in? I already know not to use high range in reverse. Thanks! —Joel Cunningham
A: It seems as if you have a dedicated and historically valuable project going on with your HMV collection. There isn’t much one can predict about an automatic transmission that is over 70 years old. If the oil or ATF looks clean and there are no metal particles in it, and if the unit seems to shift properly out on the road, and if there is no slop or hesitation from a standing start or when shifting from forward to low-range reverse, about the only other test I can think of would be a pressure test. I performed such a test on one of my M211s (the 10-wheeled version of the M135) by jacking all the vehicle’s wheels off the ground and supporting the axles on heavy wooden blocks so I could “drive” the truck while stationary. Get some kind of mechanical pressure gauge capable of reading at least 250 PSI. Connect the gauge to the main test port on the transmission. Army Technical Manual TM 9-8025 -2 (Transmission Manual) may be helpful. With the engine and transmission warmed up, the transmission oil pressure in neutral at engine idle should be between 90 and 110 PSI. In reverse, the pressure should be between 180 and 220 PSI. Out on the highway with the engine in the mid to high RPM range and the transmission in fourth gear, transmission oil pres-sure should be between 95 to 110 PSI. Other than extensively road-testing the truck, and making sure it doesn’t drag its front wheels when backing up, this is about the only other test I know of to get some idea of the transmission’s condition, Of course, as with any older vehicle, and especially if it has been sitting a long time, various problems such as leaking seals are likely to occur if one starts driving a lot.
Send your favorite Tech Tip or question to Steve Turchet at military@aimmedia.com