Knowing when to say, “Uncle.”
by Chris Causley Some of you may recall my article in the June 2015 issue of MVM on buying a military vehicle, sight unseen. It told the tale of a…
by Chris Causley
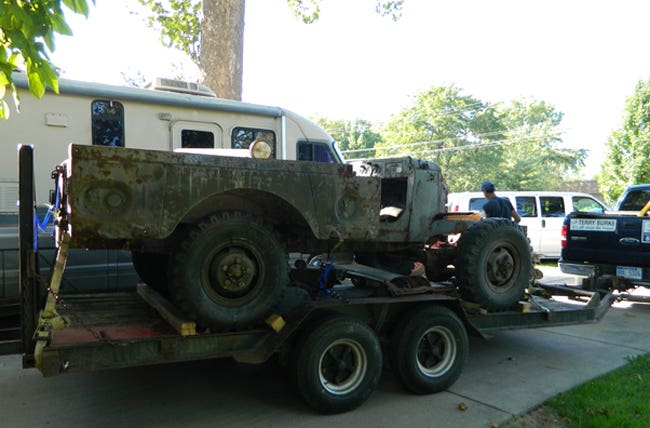
Some of you may recall my article in the June 2015 issue of MVM on buying a military vehicle, sight unseen. It told the tale of a 1944 Dodge WC-52 that I purchased. The truck in question was largely disassembled and had been “passed along” by at least two previous individuals before it landed in my shop. The moral of the story was to know what you are getting into and understand your limits.
This tale revolves around that same truck, and knowing when to step back and declare the project uneconomical to repair. During my initial assessment of the truck, it did not have any one big “red flag” that made me think it was beyond saving. As I looked at it more closely, however, I began to find many “yellow flags,” that added together, said “STOP AND RECONSIDER!”

Yellow Flag #1: The Driveline
As discussed in the previous article, the engine from the truck was seized. The purchase included a fresh long block, however (actually, as you may recall, I called the deal, “an engine with a free truck”). So,that was not a deal-stopper.
All the mechanicals seemed to be in pretty god shape, it just needed to be gone through (very normal stuff). Thegaskets, seals, and little wear items add up. Now I know, that cost should be taken into account when you do your overall assessment.
Yellow Flag #2: The Cab
As far as the body goes, the cab was the best part, the hood, cowl, firewall and dash still showed some original OD paint, and the star and hood numbers were peeking through the Swiss grey/green paint. The front floor is removable on the WC’sand I already had picked up 3 nice pieces at the MV swap in Findlay, Ohio, this past spring. The main floor was there, and the seat riser was in good shape. After “testing” a few spots in the floor with a pick hammer, though, I quickly realized that not much of the floor would survive a media blast. So, I had to add a full floor replacement to the vehicle assessment.


Yellow Flag #3: The Bed
When the truck arrived at my shop, it was clear the bed was in bad shape. The fact that most of the wood had rotted away made it look worse that it was, but there were still issues.
The bottom edges of the bed had a lot of rust, but it was mostly cosmetic, and the flat panels are easy to work. The toolbox bottoms were very thin, but again, flat panels and easy to fabricate. The wood kit is available, but the catalog says, “Call for Price” which is always a bad sign.
While cleaning up the rotted wood, I saw a bigger issue: The WC had a structural element where a piece of wood is sandwiched between two pieces of steel, and this runs the length of the bed. On the driver’s side, the lower steel piece was almost completely rotted way. This would involve major surgery. I added this to the list of things to fix.


Yellow Flag #4: The Frame
At first glance, the frame looked okay. Once I lifted the cab, I found rot directly below the passenger seat. By itself, this would not be a real issue. Yes, it was structural damage, but it was confined to one location. The damage started behind the spring perch and extended past the muffler hangar. It would bea simple fix for a person with good welding skills, but it was another thing to add to the list.


Add it all up.
As I assessed the truck, looking at each of the areas individually, I told myself, “That can be fixed.” When I was done, and I looked back at the list as an aggregate, however, I began to have that sinking feeling.
Did I really want to sink $20k in parts and thousands of man-hours into this vehicle. A clean example had just sold near me for under $15,000.(I should have bought that truck…)
In the end, my desire to “save them all” was overridden by the voice of sanity (and my accountant). This truck went up on the organ donor list.


SAGE ADVICE
It is best to avoid buying a basket case to begin with, but if you do end up with one in you workspace, take the time to assess the project as a whole before you begin investing time and money. Beware of rose-colored glasses, and realize, there is no shame in saying, “Uncle!”
Chris Causley is a founding member and current president of the Michigan Military Technical & Historical Society in Eastpointe, Michigan. A long-time collector, historian, and vehicle restorer, he has narrowed his focus to capture and preserve the story of Michigan’s contributions to the defense of the nation from 1900 through today.