Brake Systems Basics
Brake Systems Basics by Steve Turchet There are only two basic requirements for any automotive vehicle, military or civilian. That the vehicle “goes”, and that the vehicle stops. While it’s…
Brake Systems Basics
by Steve Turchet
There are only two basic requirements for any automotive vehicle, military or civilian. That the vehicle “goes”, and that the vehicle stops. While it’s usually not a life and death matter if a vehicle won’t go, it can certainly be hazardous if the vehicle won’t stop.
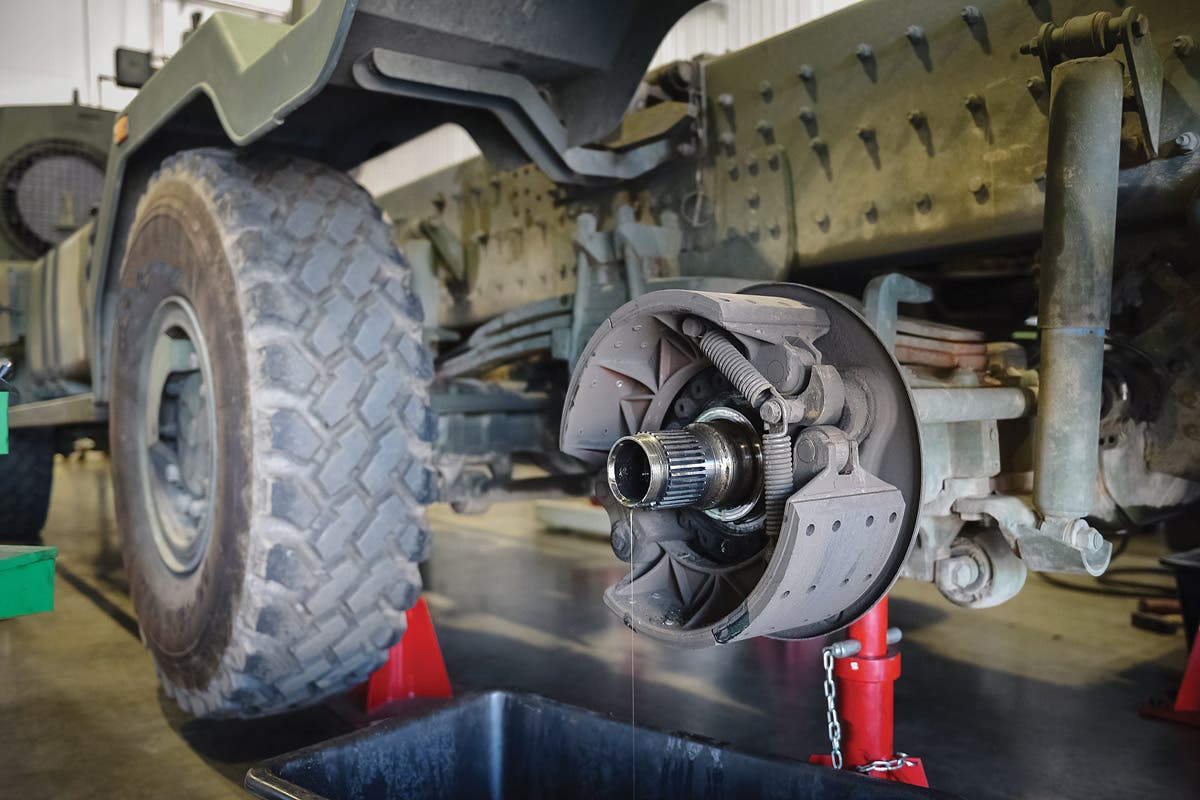
This article offers some basic information about the hydraulic service brake systems of common collectable military vehicles, including how these systems work, of what their components consist and how they bring a vehicle to a stop. It also covers basic trouble-shooting procedures and how to diagnose common brake system problems, as well as how to make adjustments and bleed the brakes
While a totally unskilled person probably shouldn’t be messing with their vehicle’s brakes, it can be just as risky if one doesn’t learn to recognize the early warning signs of brake system failure. With this in mind, we’ll start with a very basic explanation of hydraulic service brake systems used on most U.S. military jeeps, MUTTS, Dodge WCs and M37s, Kaiser M715s and many other common collectable military vehicles.
HOW BRAKES WEAR OUT
Since, for most practical purposes on this planet, a liquid is not compressible, any force, such as one’s foot on a brake pedal, is distributed equally throughout a confined liquid, which in this case is the brake fluid in a vehicle’s system. It’s kind of like three kids sitting on a bench just large enough for three, then a bigger kid squeezes onto one end and a kid is shoved off the other end. Back in the days when vehicles had mechanically-activated brakes it was vital to keep all the brake shoes equally adjusted because a “slack” shoe wouldn’t apply as much braking force. However, in a hydraulic brake system, all shoes will apply equal force, although it will take a second or two longer for loose brake shoes to contact the brake drum.
The problem with not having all the brake shoes properly adjusted on a hydraulic brake system is that there is only so much travel in a master cylinder’s piston stroke, so if the master cylinder’s piston reaches the end of its stroke before the wheel cylinder pistons have pushed all the brake shoes out against the brake drums, there may not be enough contact pressure to slow down or stop the vehicle. Folks who operate their vehicles with loose brake shoes usually have to pump the brake pedal several times, which forces additional fluid into the wheel cylinders and force the shoes more tightly against the drums.
There are two good reasons why one shouldn’t drive a vehicle with slack brake shoes: Pumping the brake pedal takes a few seconds longer to slow or stop a vehicle and operating a vehicle with loose brake shoes causes more wear on the master and wheel cylinders. In addition, the brake pedal bushings and linkages wear excessively, because the master cylinder’s piston, along with the pedal linkage components, get used twice or three times as much as they normally would. The wheel cylinder pistons have to move farther to push slack brake shoes against the drums, causing more wear on their seals (cups), eventually causing them to leak.
In most cases, if one has to pump the brake pedal several times before a vehicle slows down or stops, it means that the brake shoes are either not adjusted out far enough, or are worn out and need replacement. While most modern civilian vehicles have self-adjusting brakes, most vintage MVs do not, so one must manually adjust them to compensate for wear. Usually this wear is so gradual that one doesn’t notice that the brake pedal goes farther and farther down toward the floorboards before the vehicle slows or stops, so brakes should be checked and adjusted at regular intervals.
The gradual wearing away of brake shoe lining material, and to a lesser degree, the brake drums, is determined by how a vehicle is used and how much it is driven. If one lives in hilly or mountainous country and uses their M37 to haul heavy loads every day, then the brake linings and drums will wear faster than if one lived in the flatlands and only used the vehicle for parades and shows.
Personal driving habits also affect how fast brake shoes wear. If one tends to use the brake pedal as a foot rest while driving, then one will need to adjust or replace their brake shoes a lot more frequently than if they broke themselves of this silly habit. Bringing a vehicle to a slow, gradual stop instead of waiting until the last possible second before stomping down on the pedal will greatly prolong the life of brake shoes and significantly lessen the number of times they need to be adjusted. Other smart practices, such as gearing down on steep grades and slowing down in advance of situations where one knows they will have to stop, will also lengthen brake lining life and increase the intervals between adjustments.
FAMILIARIZE YOURSELF WITH THE BRAKES
Whether one owns a jeep, MUTT, M37, WC or an M715, a good way to familiarize yourself with the hydraulic brake systems used on all of these vehicles might be to pretend you’re buying an MV. Let’s say it’s a WWII jeep.
Imagine that this particular jeep has been sitting in a storage lot for several years. Having prior experience with buying MVs, you arrive prepared with basic tools, gas and water cans, a new battery, and the other items one usually brings to resurrect a vehicle... which should also include a can of brake fluid.
You may have been hoping to drive the jeep home within an hour or so. However, you find that the brake pedal is laying on the floor due to a broken return spring. You hook the pedal up with the toe of your shoe and try to pump up the brakes, but there is no resistance to your efforts... pumping doesn’t “build up” the pedal. You will probably say a four-letter word, but then locate the master cylinder, remove the cap, and find it empty of fluid.
Should a master cylinder be empty after a vehicle has been sitting for several years? Not necessarily: I once bought an M37 that had been sitting for six years, but its master cylinder was still full and its brakes worked fine. However, no sliding seal is perfect, and wheel cylinders have sliding seals—usually called cups—and these often leak over time. In most such cases, one should be able to simply add fluid, do a quick brake bleeding (coming up later) and drive the jeep home as planned. However, the broken brake pedal return spring will cause other problems, but since you don’t happen to have a new one in your pocket, you fill the master cylinder with brake fluid and start pumping the pedal again...and pumping...and pumping.
TIME TO BLEED THE BRAKES
At this point you might find yourself trying to remember what you know about bleeding brakes. You return home to look up brake bleeding procedures in your mechanic’s manual. Likely, you’ll find there are two basic methods, “power bleeding” and “manual bleeding.” Power bleeding can be done by one person (assuming one has a power bleeder, of course) while the manual method usually requires two people. However, a call to an auto parts store to check the price of a power bleeder convinces you that you’d rather do it the non-powered way; and another call to a fellow MVer gets you a quick description of the manual bleeding method. However, he insists that you need two people to do it and, unfortunately, he’s busy tomorrow. But, he adds that you don’t need anyone intelligent to help, just a warm body with at least one leg to sit in the driver’s seat and push on the pedal when you tell him to. You glance out the window and see your eight-year-old son swinging the neighbor’s cat, and decide you need to spend some quality time with him.
Let’s go over a few things at this point. First: What is wrong with the jeep’s brakes? The biggest problem is that air has gotten into the system, replacing the fluid that has leaked out. While we know that a liquid can’t be compressed, air, on the other hand, compresses very well, which doesn’t make it an ideal medium for transmitting force.
If the jeep’s master cylinder hadn’t been completely dry, the air in the system would have given the pedal a spongy feel, though you might have been able to pump it enough to partially activate the brakes. It’s also possible that by adding more fluid and doing a lot of diligent pumping, the air would have eventually bled itself out, escaping past the wheel cylinder seals.
However, in this case, the master cylinder and brake lines were dry, so you poured the new fluid in on top of the air, trapping it in the system. Some air would have probably bubbled back out of the master cylinder, because air wants to rise to the highest point, but the broken spring prevented the pedal from returning to its upright position, which would have allowed the air to escape through the master cylinder’s bypass port.
Of course you didn’t know all this, but you did buy a “universal brake/clutch pedal return spring” on your way back to the jeep the next day... or a fellow jeeper gave you a correct one. You install the spring so your son won’t have to toe the pedal back up after each downward stroke.
Bleeding brakes is a simple step-by-step procedure if done correctly. On the other hand, it can turn into a shouting-match between two (potentially former) friends if one or both doesn’t do their job right. But, again, the procedure is simple: first make sure that the top of the master cylinder is clean so no dirt, rust flakes, or gobs of grease fall in when you take off the cap. Then fill the reservoir with new brake fluid. In a situation like this where you don’t know what condition the system is in, you might as well use the cheapest auto-mart fluid. Replace the reservoir cap because sometimes air will bubble back as you’re pumping the pedal and the fluid will spew all over the place. Your son (or agreeable friend) will sit in the driver’s seat to pump and hold the pedal.
The most important point to establish is that the person -- in this case yourself -- who is crawling around under the vehicle is commander-in-chief of this operation, and your “pedal-pal” is to do exactly what you tell him to do when you tell him to do it. It’s extremely frustrating to have a pedal-pal who knows just enough about what’s going on to anticipate your next order and perform it prematurely. I say again, what is needed here, is someone who will do exactly what you say when you say to do it, no more and no less. It is also less trying of both parties’ patience if you establish what each order means and what your pedal-pal is expected to do when he or she hears it.
There are three basic commands for your pedal-pal: “pump”, “hold” and “let up” (or “release”), and about the only two things he should say to you are “up” and “down.”
Understood?
Make sure you have the proper size wrench to fit the bleeder vent screws on your particular vehicle; and some MVs, such as half-ton Dodges, may have different size bleeders on the rear wheels than on the front. These screws are often rusted in place, so a six-point combination wrench or a deep six-point socket is usually the best tool, though you may have to resort to small Vise-Grips to break the screws loose. It’s wise to make sure that all the vent screws on every wheel can be opened before you get down to business.
There is a debate among mechanics as to which wheel cylinder one should bleed first, and in what order to bleed them. Some people advise starting with the wheel cylinder farthest from the master, which is usually the right rear on left-hand drive vehicles. Then work back in order of decreasing distance to the wheel cylinder closest to the master, which is generally the left front. Other mechanics insist that one starts with the left front wheel cylinder and moves back in order of increasing distance to the right rear wheel cylinder. Still others say that it really doesn’t matter what wheel cylinder you start with or in what order you bleed them. However, I always start with the right rear and work back to the left front because it seems logical that the longer the brake line the more air it contains.
Anyway, with the master cylinder full of fluid and your wrench on the bleeder screw of your choice, tell your pedal-pal to “pump.” This means he will pump the brake pedal with slow, full strokes until it comes “up,” or at least until he begins to feel some resistance, at which point he should say “up.”
You tell him “hold.” This means that he will keep pressure on the pedal with his foot. Open the bleeder screw, and be careful of your eyes... safety goggles are smart. Air, or air mixed as bubbles with brake fluid, should spit out of the vent. If your pedal-pal was able to get an “up” pedal, the pedal will now sink to the floor beneath the pressure of his foot as the air/fluid spurts out of the bleeder screw’s vent, at which point he should tell you “down.” He will now hold the pedal to thefloor until you tell him to “let up” or “release.”
Close the vent, then tell your pedal-pal to “pump” again. When he calls “up,” tell him to “hold,” and open the vent once more, letting additional air and/or bubbles squirt out until your pedal-pal calls “down.” Again, you tell him to “hold,” close the vent, then call “let up” or “release.”
It’s really that simple.
Repeat this sequence until a solid spurt of brake fluid without any bubbles comes out of the vent. This usually takes about three run-throughs of the “pump, hold, and let-up” procedure. When no more bubbles come out, close the vent securely, tell your pedal-pal to “let up” or “release,” then slide out from under the vehicle and top-off the master cylinder with fluid.
Now move on to the next wheel cylinder and do the whole procedure again. Remember to top-off the master after bleeding each wheel cylinder, because if you let the reservoir get low you’ll be pumping air back into the system and will have to start all over. Likewise, if your pedal-pal isn’t paying attention and “lets up” when he should be “holding,” air will get into the system again. However, if you’ve worked together as a team, then you should now have functional brakes. In some cases where the system was totally dry, you may have to run though the whole procedure twice before the brake lines and wheel cylinders are completely bled of air.
So, that’s the two-person method of bleeding brakes on most common collectable military vehicles without a brake booster. An option for loners like myself are those cheap little blister-packed “EZY-BLEEDER” kits available at most auto-mart stores. However, I’ve found that a more expensive hand-operated vacuum pump kit (usually under $50.00) works much better and faster. With a vacuum pump, one simply fills the master cylinder, opens a wheel cylinder vent, attaches the pump’s hose and the pump sucks the air out. No need to have a pedal-pal, or pump the master cylinder. There is also the “hose and jar” method of bleeding brakes, but it tends to waste a lot of fluid.
For larger MVs, such as the Chevrolet G-506, International M-3-4, Ford GTB, and G.M.C. CCKW or DUKW with vacuum-boosted (hydrovac) brakes, the bleeding procedure is the same except one bleeds the vacuum-booster first, and should usually have the engine running to provide vacuum. For MVs, such as the G.M.C. M211 and M35 with air boosters, one would also bleed the booster first. For vehicles having two wheel cylinders per wheel, bleed the upper cylinder first, or the cylinder that is farthest from the axle brake line.
WHAT ABOUT THE SHOES?
Now back to our imaginary jeep.
Even though you should now have functional brakes after successfully completing the bleeding procedure, that doesn’tnecessarily mean that you might not have to pump the brake pedal once or twice to keep it from hitting the floorboard before the vehicle slows down or stops. If this is the case, and you’re certain that all the air is out of the system, then your problem just about has to be brake shoe adjustment...meaning the shoes are too far back from the brake drums to exert full braking force on the first stroke of the brake pedal.
Almost every MV has a different way to adjust its brake shoes, and a manual is always handy to find the right method for yours. However, no matter how brake shoe adjustment is accomplished, its purpose is always to bring the shoes far enough out toward the brake drum so that only a minimum amount of wheel cylinder piston travel is required to exertmaximum braking force. On the other hand, you don’t want the brake shoes adjusted out so far that they drag against the drum, producing heat, unnecessary lining wear, and increasing fuel consumption.
Adjusting your vehicle’s brake shoes is something you can do alone. You’ll be jacking one wheel at a time off the ground with the vehicle’s transmission in neutral and the parking brake off, so have the proper capacity jack and block one or more wheels to keep the vehicle from rolling. It doesn’t matter which wheel you do first, or in what order you do them.
With the wheel of your choice raised clear of the ground, rotate it slowly by hand while turning the brake shoe adjusting bolt or mechanism until you feel and hear the shoe (or shoes) begin to drag lightly against the drum.
My own method on vehicles with individual brake shoe adjusters (two per wheel) is to first bring each shoe out tightly against the drum. Doing this pushes the wheel cylinder piston into a fully retracted position. Then I back off the shoes until the wheel can be easily rotated again. Finally, I adjust each shoe out until they just start to drag. For vehicles where both brake shoes are adjusted by one mechanism, such as a “star wheel,” I again first adjust the shoes firmly against the drum. Then I back them off until the wheel rotates freely, and finally adjust the shoes out once more until a slight drag is felt.
Like most things one learns from experience, how “slight” is slight is hard to define, but if you’re in doubt it’s better to go a little bit loose than too tight. Too loose can be readjusted, but too tight will produce heat as the brake shoes drag against the rotating drum. Most things expand when they get hot, and what at first was only a little drag will increase rapidly. Also keep in mind that most common U.S. MVs have self-energizing brakes. This means that the brake shoes are pulled tighter against the drum after first contact by the drum’s rotation, so you definitely don’t want the shoes to drag.
Repeat the adjustment procedure on all your other wheels and chances are excellent that you’ll have a solid brake pedal that only requires an inch or two of downward travel before the brakes take hold. Make sure that the pedal has a small amount of free play. This is necessary because without it there could be a slight continuous pressure on the master cylinder’s piston, producing the same effect as resting one’s foot on the brake pedal.
On some MVs, such as the M37, and the CCKW with Timken axles, proper brake shoe adjustment also requires adjusting the anchor pins on the bottom of each shoe as well as the adjusting bolts at the top. This can seem like a complex and intimidating process, but it’s not rocket science and a manual should simplify it.
In the case of our jeep, you should now check over the whole brake system -- lines, hoses, master cylinder -- for condition and leaks before setting out for home.
Driving the jeep, you notice it has a tendency to dart to one side whenever you step on the brakes. Then a yellow light takes you by surprise at an intersection and you stomp down hard on the pedal. The jeep jerks violently to one side and you hear a loud squeal. Now what’s wrong? You may recall that many older MVs have riveted brake linings, and you wonder if your linings could be worn down to the rivets.
That’s possible, but usually in cases where only one wheel grabs—often yanking the vehicle to one side—and/or the squealing sound doesn’t have a metallic scrape, it means there may be oil or grease on the brake shoes. This is usually caused by leaky wheel bearing seals, and the remedy is to clean and repack the bearings and replace the seals. Doing this will also give you the opportunity to check all the brake system components at each wheel. If you find that the brake shoes and/or drums are badly worn, you should have the shoes relined, or get replacements, and have the drums “turned” to get rid of the wear ridge and make the braking surface smooth. It’s common for older jeeps to have hideously worn brake drums, and these should be replaced.
One can rebuild their old wheel cylinders at home, using an inexpensive wheel cylinder hone available at just about any auto parts store. This is a simple job, and unless the wheel cylinders are badly rusted and pitted inside, rebuilding them yourself will save the cost and bother of trying to locate NOS or replacement units. While your local auto-mart store probably won’t have a listing on its computer for a 1943 Willys MB, wheel cylinders can be measured and new kits obtained by size.
Unless one is a purist about things on a military vehicle that can’t be seen, it really doesn’t matter whether its brake shoes are relined with original style riveted material or modern bonded linings. Either works equally well, though some people prefer bonded brake shoes because they often last longer. This is because more lining can be worn away without exposing rivets. Rivets may also score the brake drums if one doesn’t regularly check for lining wear.
Some vehicles have just the right combination of brake component design and lining materials which make them prone to squealing, but even though the sound may be annoying, it’s harmless. Dodge WCs and M37s are noted for having squeaky brakes, and early model Toyota Land Cruisers were famous for this trait. Wet brakes also tend to squeal.
Incidentally, one should be careful after driving though deep puddles or across streams, because many older vehicles with non-boosted brakes may not stop after their brake shoes and drums have been submerged. After leaving the water, it’s wise to try stopping. If the vehicle doesn’t want to stop, keep a gentle pressure on the brake pedal, which will heat up the linings and dry them.
If, after inspecting your brakes, you find that all the components seem in good condition and free of grease or oil, yet the brakes still screech, try replacing the brake shoe return springs. These springs age and gradually lose their tension. Being overheated will also weaken them; and loose springs will sometimes let the shoes chatter and squeal. If this still doesn’t stop the noise, and assuming it really bothers you, you may have to have your brake shoes relined with a different type of material.
A BIT ABOUT BRAKE FLUID
Finally, what about brake fluid? What type is best for your vintage MV? This is a subject of much debate, but for most common collectable U.S. military vehicles the choice is up to you...though one should avoid mixing different types of fluid. In case you ever wondered, most brake fluid used to be a mix of castor oil and alcohol, though today’s fluids are more scientific.
It’s a good idea to replace the fluid about every two years, and this is accomplished by bleeding the system the way we did with the imaginary jeep. I recommend investing in a hand-operated vacuum pump though some people have had bad experiences with them, such as collapsing the cups in a wheel cylinder.
Should one use silicone brake fluid in their vintage MV? Silicone brake fluid is reputedly inert, which means that it shouldn’t have any adverse reactions with anything in a brake system no matter what age or type. The main advantage of silicone over conventional brake fluids is that it doesn’t attract water, which would seem to make it ideal for MVs that aren’t driven a lot.
On the other hand, its main disadvantage (besides high price) is that, unlike conventional brake fluid, it may not expand the rubber seals in your master and wheel cylinders and will gradually leak out. If one does use silicone fluid, then check the master cylinder often. Silicone fluid also tends to bubble, and should probably not be used in larger MVs with brake boosters (although I used it in a GMC M211, and it worked fine).
With that, the lesson concludes. One might say, the “basics” on brakes has basically stopped.


