Air Brake Basics
Blow your tanks daily! by Steve Turchet Experience may be the best teacher, but it’s often a hard way to learn and requires being lucky enough to survive the mistakes…
Blow your tanks daily!
by Steve Turchet
Experience may be the best teacher, but it’s often a hard way to learn and requires being lucky enough to survive the mistakes you make. Learning from experience usually takes more time than learning from a qualified source. It can also cost you a lot more money than having the knowledge to do something right. I’ve learned many things from experience because there was no other way to learn it. While I was lucky to survive my mistakes, I wasted a lot of time and money. It’s my hope that by writing these articles, I can save others from doing the same.
My first experience driving a vehicle with air brakes was a summer in my teens when I worked as a wood cutter in the coastal mountains of Central California. I was lodged in an ancient Masonite trailer without electricity or running water, given a ten-ton Tyrannosaurus of a gear-drive McCulloch chain saw, and paid by the cord for all the oak and madrone I could truck the thirty miles into town. While there was plenty of fresh air andsunshine, there were also deer flies, yellow jackets, and ticks.
The cool perk of this job was the Truck. It was a 1943 Autocar U7144T, cabover, six-wheel-drive, and one of the most awesome vehicles I had ever seen up to that time.
For MVM readers unfamiliar with the heavy and lesser-known U.S. military trucks of WWII, the U7144T — along with similar models manufactured by White, Kenworth and Marmon-Herrington — was built as a tractor in both open and closed cab versions.
My truck was a closed cab model. It had a Hercules RXC 529-CID gasoline engine, a five-speed non-syncro transmission with 5th gear overdrive, a two-speed transfer-case, and an early style air-brake system with a mechanical parking brake.
As with most heavy trucks of WWII, relatively few examples of U7144Ts survive today,though from the late 1940s into the 1970s, these trucks were choice vehicles for house-moving companies and other applications where brute power at low speeds was needed. My truck was fitted with a stake bed for wood hauling, but was otherwise stock, right down to the blackout lights and tiny round mirrors. It was capable of about 45 mph on the highway, but my boss warned me never to exceed 35 — especially going downhill!
It took me about three days to fell the trees my boss had marked, cut and split the rounds, load the truck, and drive it to town. There, I had to unload and stack the cords in the wood yard. I probably didn’t have to work that hard — in fact, my boss seemed surprised that I did — but, after all, if I didn’t cut and load the wood, I couldn’t drive the truck!
I felt very mature to be trusted with that mighty machine and did my best to follow the boss’s instructions, though keeping its downhill speed below 35 mph on steep mountain roads with a load of wet wood and those old-fashioned brakes was impossible. The truck had no tachometer, but it was obvious the old Hercules did not like high revs. I would come to a stop at the top of each grade and make sure I had a full tank of air. Sometimes the unloader valve stuck — a problem I learned how to solve through experience. Then I started my descent in the lowest gear, shifting up only when the engine began to roar in outrage. I tried touse a minimum of air for the brakes. Nevertheless, I would usually arrive at the bottom of the grade in top gear spinning at maximum RPMs and smoke pouring out of the brake drums and the low-air warning “wig-wag” wagging.
I learned many things through experience that summer and was lucky enough to survive my mistakes. Besides how to drive and maintain a vehicle with an air brake system (Rule number one: Blow your air tanks daily!), I learned how to back down narrow logging trails using only those tiny round mirrors. Imagine how easy it was after that to back up a truck with “real” mirrors!
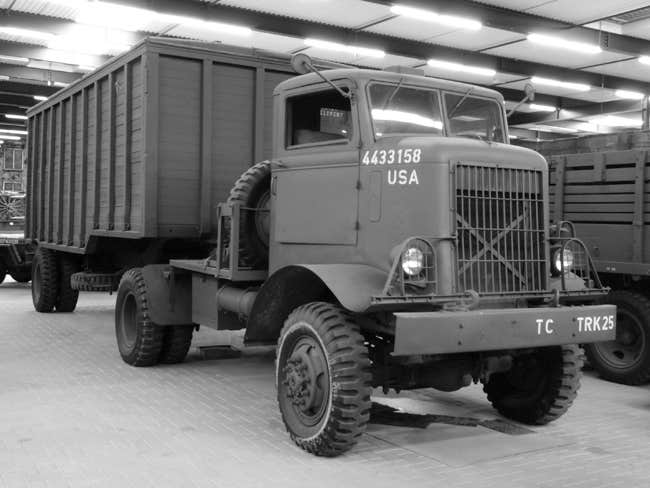
My second experience with air brakes came in my mid-twenties when I took a job with a scrap-iron company in northern Arizona. The truck was a 1966 Diamond T cabover ten-wheeled tractor with a 335 Cummins engine and a Road Ranger 10-speed transmission pulling a forty-foot Freuhauf flatbed trailer fitted with steel side boards. My mission was to cut up the scrap with a torch, load the truck with a front-end loader, then deliver the iron to a foundry in Phoenix. The legal maximum GVW at the time was 80,000 pounds, but my boss liked to add another two tons, claiming “they paid for the trip.” Of course, if I had been stopped and weighed, the fine would have been more than the whole load was worth.
The eight-hour journey to Phoenix — usually at night after spending all day loading the truck — was mostly uphill and downhill, requiring constant gear-shifting and frequent use of the brakes. First came a downhill run out of town, then a climb into the mountains, then down again to a fairly level stretch followed by a long uphill climb into Flagstaff. From Flagstaff to Phoenix, it was mostly downhill with one long climb out of Verde Valley.
These days, you can see semis climbing those grades at 60 mph, but back then, most big trucks were lucky to climb them at 20! My chronically overloaded Diamond T usually toiled along at much less.
Going down was another experience! As with the old Auto-car, I began my descents in the lowest gear, shifting up only when the tach red-lined. Again, I arrived at the bottom in top gear at max RPM with low air pressure and smoking brakes.
Maintaining minimum pressure was vital, because this truck had a later model air system with spring parking brakes which would automatically come on if the pressure dropped below 60 psi. I often had to grit my teeth and keep my foot off the brake pedal while the overworked compressor struggled to keep up. The truck was geared for 70 mph, but it took every skill I learned the hard way to stay under 75, and by then I was only steering forty-plus tons of runaway vehicle.
Looking back, it seems a wonder I survived these ordeals that occurred about three times a week for several years. During that time, I learned many more things about air brake systems and their components, but Rule Number One still applied: Blow your air tanks daily!
I can’t stress this too strongly. No matter what type of air system your vehicle has, ninety percent of most common problems can be avoided by blowing your air tanks daily!
Why? When compressed, air gets hot. When it cools in your vehicle’s storage tanks, condensation forms. Water in an air system causes many problems just on its own. Sitting in your tank, it also creates corrosion, which produces rust flakes. These are usually responsible — as stated above — for ninety percent of most common air system problems.
Which is something you don’t have to learn from experience.
FOUR BASIC SYSTEMS
Pertaining to most historic military vehicles (HMVs) in the hobby, there are four common air systems, listed here in order of prevalence:
1. Air-Over-Hydraulic: Used on most M-series deuces.
2. Early Straight Air: Usually with mechanical parking brake — used on many heavy WWII vehicles.
3. Later Straight Air: Used on some late and current model M-series vehicles.
4. CTIS (Central Tire Inflation System): used on DUKWs and some current model M-series vehicles.
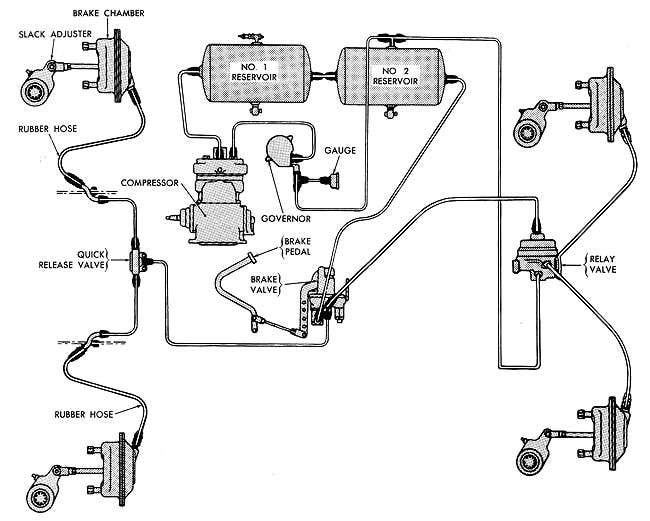
All of these systems share many of the same components: An air compressor, an unloader valve (or governor), air lines, and air storage tanks. Beyond these basic items to compress and store air, they differ in how that air is used.

Air-Over-Hydraulic
In air-over-hydraulic systems, compressed air is used to boost the braking force of conventional hydraulic brakes through a device sometimes called an “air pack.” This item is similar to power brake mechanisms on many automobiles and light to medium trucks, except it uses air pressure rather than vacuum to operate. In most of these systems, the vehicle’s brake foot pedal activates a conventional hydraulic master cylinder, which in turn activates the air pack, which activates another hydraulic master cylinder, which finally activates the vehicle’s hydraulic wheel cylinders, applying the brake shoes to the brake drums.
Since air is used only to boost braking force, the hydraulic brakes will still operate and slow or stop the vehicle even if the air system fails, though much greater effort will be required from the driver’s foot on the brake pedal. The vehicle’s parking brake is usually mechanical and independent of the service brake system, and may also be used to slow or stop the vehicle should the service system fail.
The primary advantage of this system is increased braking power with less driver effort than either straight hydraulic or vacuum-assisted brakes. The primary disadvantage is that, besides an hydraulic brake system to maintain, there is also an air system. In addition, air-over-hydraulic brakes are not suitable for very heavy vehicles because the heat generated by the brake shoes against the brake drums may cause the hydraulic fluid to boil.
Repair and maintenance of the hydraulic portion of these systems is essentially the same as most conventional hydraulic brake systems. Read your manual.

Straight Air Systems (Early and Late)
In both early and later style Straight Air Systems, the brake foot pedal is connected to, or is part of, a valve that supplies compressed air — usually through a relay valve — to air chambers (or “brake pots”) at the vehicle’s wheels, applying the brake shoes to the brake drums. If air pressure is lost, so are the brakes.
In most Early Style systems — such as my Autocar — the parking brake is mechanical and independent of the service brake system and may be used to slow or stop the vehicle... sometimes. The primary advantage is much greater braking force than either straight hydraulic or power-assisted hydraulic brakes and much more resistance of the wheel mechanisms to heat. Another advantage is relative simplicity, since there is only an air system to maintain. The primary disadvantage — as already stated — is if air pressure is lost, you can only hope the parking brake will slow or stop the vehicle.
The later type Straight Air System operates basically the same as the early type. The main difference is that the wheel air chambers — usually only on the rear axle or axles — have powerful springs inside. When there is no air pressure in the chamber, the spring holds the brake shoes against the brake drum. This is intended primarily as a parking brake function.
At vehicle start up, air pressure must build to a certain point — usually above 60 psi — before the spring brakes can be released. After this, the system operates like the early type.
Most vehicles with this kind of system do not have mechanical parking brakes. If air pressure is lost, the spring brake mode is applied automatically and the driver cannot prevent it. In some cases, this may slow or stop the vehicle, though the driver will probably be fighting hard to stay in control. In other cases — such as my Mr. Toad’s wild rides in the Diamond T — the brakes will only burn out, so you must try to maintain at least minimum pressure. Praying may help.
CTIS (Central Tire Inflation System)
The CTIS system, familiar to DUKW owners, has most of the same components of the other three, except the air is used for inflating the vehicle’s tires. A DUKW’s service brake system is hydraulic with a vacuum booster, as used on most CCKWs and other WWII deuces. However, some later and current vehicles also use the CTIS air system to boost hydraulic brakes. On the other hand, some vehicles use their air brake system to also operate CTIS.
While there has been much refinement and sophistication of air brake systems in the decades since I steered runaway trucks down mountains, most HMV hobbyists own vehicles with relatively simple versions of the four types described above, so we’ll now go into some basic descriptions of their various components and how to troubleshoot and maintain them.

BASIC MAINTENANCE
Rule Number One: Blow your air tanks daily!
If you’ve just acquired your first air-system-equipped HMV and think this term rather ominous —or colorful — it simply means opening the drain valves on all your vehicle’s air storage tanks after you have driven the vehicle and when those tanks are still under pressure. Please trust someone who’s learned from experience:Most air system problems can be avoided by following this rule.
Also, as with fuel tanks, condensation can form over time simply because of temperature changes. So if your HMV sits for long periods without being driven, always blow the air tanks under full pressure after initial start up.

BASIC COMPONENTS
Remember, this is only a basic air brake article about primary components. Specific maintenance procedures for your own vehicle’s air system will be found in its service manual.
To compress air, you obviously need an air compressor, and all four systems have one. The most common types are two-cylinder models. These are basically the same in design regardless of manufacturer. In most cases, they are mounted on a vehicle’s engine and belt-driven from the crankshaft pulley, though some diesel engines use gear-driven compressors.

They are very much like small engines themselves, having pistons, valves, and a crankshaft. Most have roller bearings and are pressure-lubricated by oil from the vehicle’s engine, though some have additional internal oil pumps. A few vintage vehicles have compressors with self-contained oil supplies, so their crankcases must be checked, kept filled to the correct level, and changed separately from the engine oil.
In most other applications, what applies to caring for the vehicle’s engine — keeping the oil at the proper level, changing the oil and filter at prescribed intervals — also maintains the air compressor. Some, usually vintage, compressors have their own air filters, which must be checked and cleaned at regular intervals, and more frequently when operating in dusty environments. Other compressors take in air through the engine’s air cleaner, so that must always be well maintained.
Many compressors are liquid-cooled from the engine’s coolant, while others are air-cooled and must be kept clean. If your vehicle’s compressor is liquid-cooled, keep in mind that if the engine is running too hot, so is the compressor.
Most compressor preventive maintenance is obvious: them clean, check oil and coolant supply lines for leaks and condition, and keep the drive belts tight. Most compressors are incredibly tough and long-lived, but, just like engines, you should listen for loose bearings and piston noise indicating excessive wear. Most compressors can be rebuilt or exchanged.
All air systems have air lines, hoses, and piping of various types. Preventive maintenance consists of regular inspections for condition and tightness of connections and fittings. Pay particular attention to the main supply line from the compressor as well as any flexible lines — especially lines to brake pots. Look for any looseness of mountings or lines that are chafing against something.
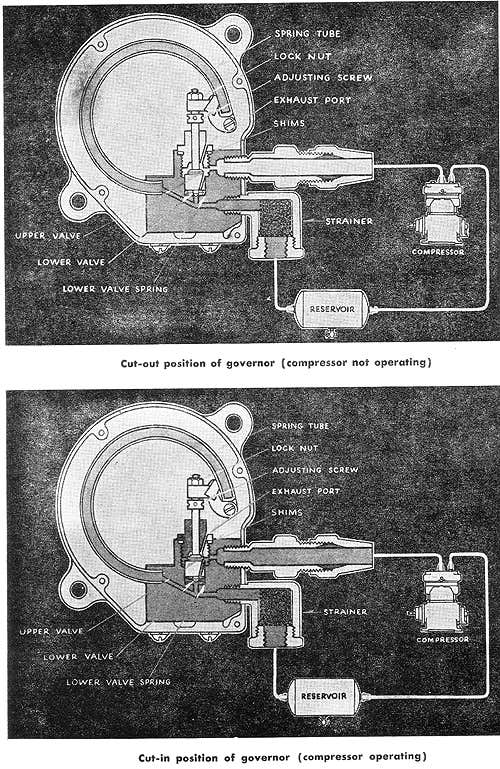
Unloader valves (or governors) maintain the correct air pressure in a vehicle’s air storage tanks by “telling” the compressor when to cut in and when to cut out. There are two basic types of unloaders that we can simply call “early” and “later” styles.
Most WWII-vintage vehicles are equipped with the early type. This operates by a Bourdon Tube. Later models are usually spring-loaded.
Some early air systems operated with a maximum or “compressor cut-out” pressure of 90 psi.120 psi is usual for most later systems.
Unloaders are generally the most common air system components to cause problems. Bear in mind, most unloader problems are caused by not blowing the air tanks daily.
The most frequently occurring problem is “sticking” in the unload position so the compressor won’t build up pressure in the tanks. This is almost always caused by rust flakes!
Many times, an unloader — such as the early type on my Autocar — can be “fixed” by simply tapping it with the handle of a screwdriver, though this really doesn’t fix anything. It only knocks the rust flake out of the internal mechanism. The flakes will eventually jam it again. If a tap or two doesn’t work, you can often “fix” an early type unloader by removing the cover, gently working the mechanism with your fingers and spraying it with WD-40 or something similar.
Later style unloaders can usually be disassembled and cleaned. However, the only way to really fix most sticking unloaders is to disassemble the entire air system and thoroughly clean every line and component.
Guess how all this trouble can usually be avoided?
And while most unloaders generally stick in the unload position, it occurs most often during initial vehicle start up — especially if the vehicle has been sitting awhile. However, if you’re driving along and your air pressure starts dropping, a stuck unloader is on the list of things to check after you’ve (hopefully) stopped along with more obvious causes such as leaking or broken air lines or a slipping or broken compressor drive belt.
Rust flakes can also jam other components, such as brake pedal valves, relay valves and air packs. Blow your air tanks daily!
What’s a relay valve? In all but very early systems, relay valves are used for faster and more effective brake response.
Basically, instead of routing air directly from the foot pedal valve to the brake chambers, the air is routed to a relay valve and acts as a signal to the relay, which, in turn, routes air from the storage tanks to the brake chambers. The relay valve is usually what you hear hissing when you take your foot off the pedal releasing the brakes.
In some systems a stuck relay valve will do the same thing as a stuck unloader and air pressure will not build up in the tanks. Sometimes, like an unloader, a stuck relay valve may be “fixed” with a few gentle taps. Or, it may have to be disassembled and cleaned.
Can you guess the most common cause for sticking relay valves?
APPLY THE BRAKES
The primary maintenance of air storage tanks should hopefully be obvious by now. In addition, you should regularly check all the mountings, fittings, and lines for tightness and condition. On most air systems, at least one of the tanks has a safety valve to prevent excessive pressure. You should consult your manual when checking this valve to be sure it’s correctly set and functional.
Air tank rupture is fairly rare, but tanks will eventually rust out from within and develop leaks — and much faster if you don’t perform a certain daily procedure. Air tanks should be carefully inspected when buying an older HMV, especially if it’s been sitting a long time, and most especially, if you plan on driving it home.
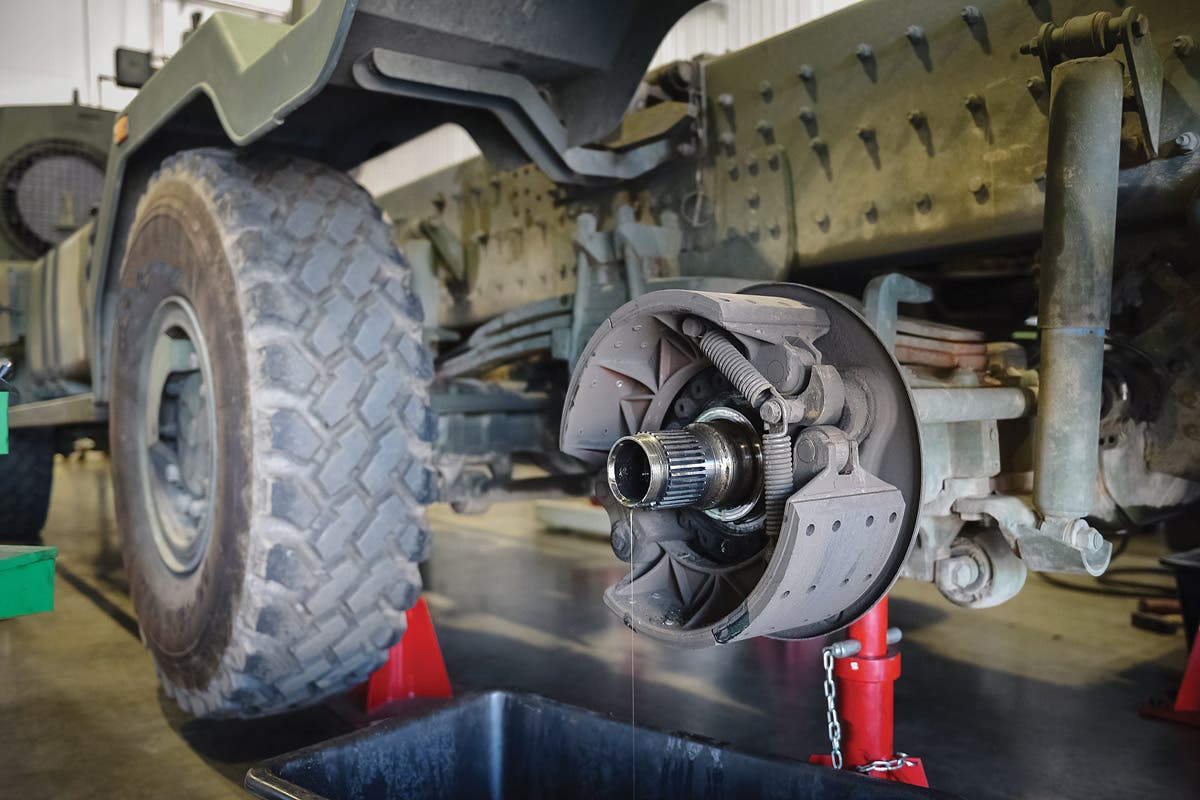
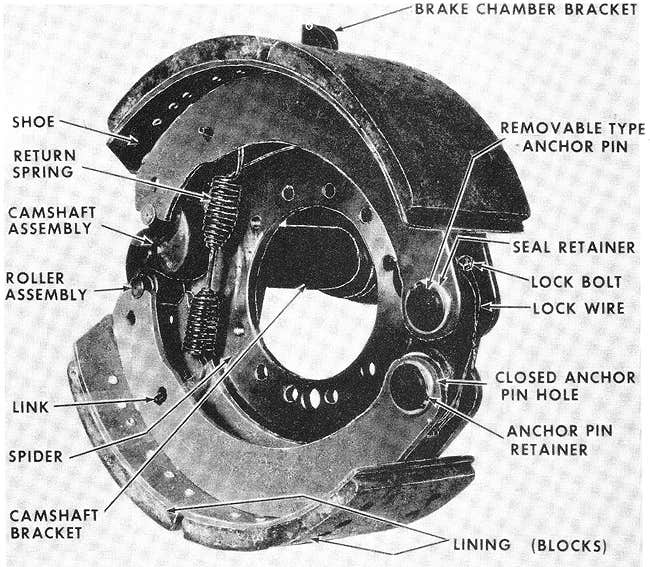
Like unloaders, air chambers (or brake pots) come in two basic flavors: Early and later. Additionally, they may be either single-acting or equipped with internal springs to also act as parking brakes.
Many early types are bolted together. Replacing the diaphragms is a simple and obvious procedure.
Many later types are held together with clamping bands. Replacing their diaphragms is also a simple and obvious job.
Spring brake chambers, however, should only be disassembled after you’ve read the correct manual for that particular type — those springs are very powerful. While an air pack probably won’t hurt you, you can do a lot of damage to it if you don’t have the right manual!
Adjusting most air brake shoes is usually a simple procedure, and, again, you should have the right manual for your particular vehicle. Many later style slack adjusters have a locking collar which must be pushed in before the adjusting bolt can be turned. If stuck or rusted in place, WD-40 and/or a little heat will usually free them.
Hopefully this article will keep a few folks from having to learn about their air brake systems only from experience.
Don’t forget: Blow those air tanks daily!